Spatial Genomics
Spatial Genomics
 10X Visium Spatial Gene Expression
Measure gene expression activity in the context of tissue microenvironment.

Sample Requirements:
Fresh Frozen Tissue:
- Tissue should be snap frozen and embedded in OCT embedding medium. For detailed tissue preparation, please reference the 10X Tissue Preparation Guide.
- Prior to placement on the optimization or gene expression slide, RNA quality should be assessed by collecting 10 (10um) sections for RNA extraction and QC. 10X recommends use of tissue blocks with a RIN value of 7 or greater.
- For a list of tested tissues and recommended tissue thickness, please reference the 10X Tested Tissues List.
- Before proceeding with the Gene Expression slide, Tissue Optimization should be completed on each new tissue type. The Optimization slide is used to determine the optimal permeabilization time. This will require 7 tissue sections at the appropriate thickness.
FFPE Tissue:
- Compatible with Human and Mouse tissues at 5um. For detailed tissue preparation, please reference the 10X FFPE Tissue Preparation Guide.
- Prior to placement on the slides, RNA quality should be assessed by collecting the following:
- Smaller Tissues (≤6.5 x 6.5 mm) = 4 (10um) Sections
Larger Tissues (≥6.5 x 6.5 mm) = 1-2 (10um) Sections - 10X recommends use of FFPE tissue blocks with a DV200% of 30% or greater.
- Smaller Tissues (≤6.5 x 6.5 mm) = 4 (10um) Sections
- Probe-based design: ~18,000 Human Gene Targets and ~20,000 Mouse Gene Targets
Visium HD Now Available!
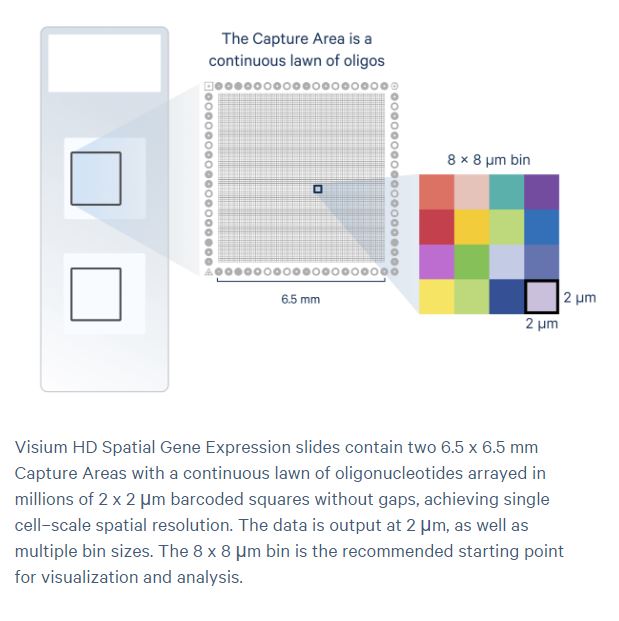
Explore spatial transcriptomics at single-cell resolution with the Visium HD.
Learn more about 10X Visium Spatial Gene Expression.
Coordination with GRC:
If you are interested in performing a Visium experiment, please contact us so we can schedule a project consultation. Due to expiration of reagents, we order Gene Expression Slides and Reagent Kits as needed. If you are in need of sectioning assistance, we have a contact we can coordinate with for slide transfer and cutting.
If you would prefer to complete the lab work in your lab, please let us know and we can coordinate transfer of slides and reagents. You can then submit ready-to-sequence libraries to the GRC using our User Prepared Library submission form on our Sample Submission Page.
How to start a 10X Visium project with the GRC:
1) We prefer to have meetings with investigators to discuss the steps of the project and ensure this is the correct approach for your research goals. It is critical to meet with the GRC staff to ensure the instrument and necessary reagents are available for your project. Please contact us to schedule a meeting.
2) Next, evaluate RNA quality of your samples. Section curls for RNA extraction to determine DV200%. 10X recommends DV200 of 30% or greater.
- Smaller Tissues (≤6.5 x 6.5 mm) = 4 (10um) Sections
Larger Tissues (≥6.5 x 6.5 mm) = 1-2 (10um) Sections
3) Section your samples on your slide in the green allowable areas according to the 10X tissue alignment guide. Please follow the guidelines listed in the Tissue Preparation Guide. If you need assistance with cutting, please let us know. We often work with Jeff Fox at the CMSR. There are break points where the slide can be transferred:
- If you have no oven, you can transfer slides to GRC after sectioning (step 2.3f). This requires coordination to ensure the slides are processed appropriately.
- If you have no desiccator, you can transfer slides to GRC after drying in oven (step 2.3g). This requires coordinate to ensure the slides are placed in the GRC desiccator in a timely manner.
- If you are able to section, dry in the oven, and place in desiccator, the slides are stable for up to 4 weeks. Please contact a member of the GRC staff to coordinate slide transfer for further processing.
4) GRC staff will process the remainder of the protocol for you. Step 1 is to perform H&E staining and imaging. Once this is complete, we will email you VSI files for you to review your sections to determine the area you would like to be within the capture area (6.5 x 6.5 mm). To view these files, please download the free OlyVIA software and search for the VS120 scanner. Ensure the OLYMPUS OlyVIA-VirtualSlide Image document and the corresponding File folder are both within the same directory to open properly.
- Please note: it is sometimes helpful to go through this process with a test sample. We are happy to do a test slide through staining + imaging to show you a representation of how your tissue will look within the capture area.
5) Once the area is confirmed, we will proceed with library preparation and sequencing.
Visium HD Analysis:
Get a head start by downloading Loupe Browser here: https://www.10xgenomics.com/support/software/loupe-browser/downloads
Here is a tutorial on how to start looking at the data: https://www.10xgenomics.com/support/software/loupe-browser/latest/tutorials/introduction/lb-navigation-for-spatial
We recommend you taking a quick look using this software and then we should schedule a meeting with our bioinformatics group to discuss additional help with analysis.
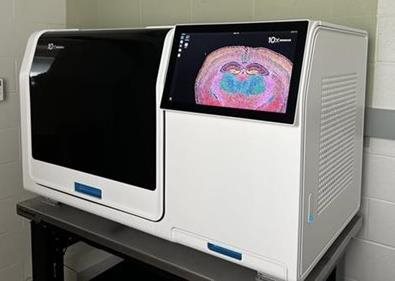
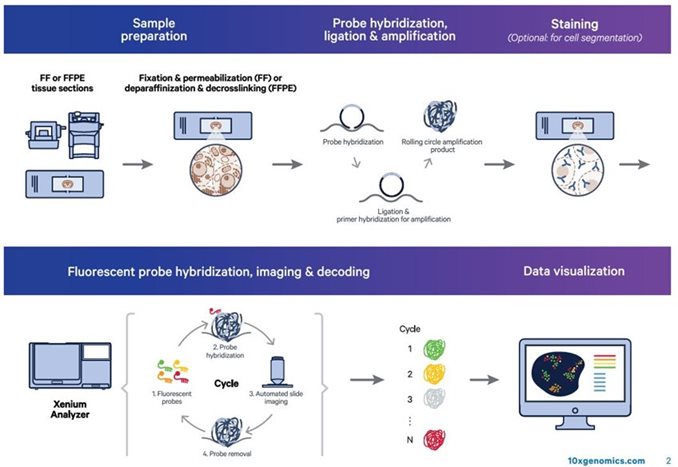
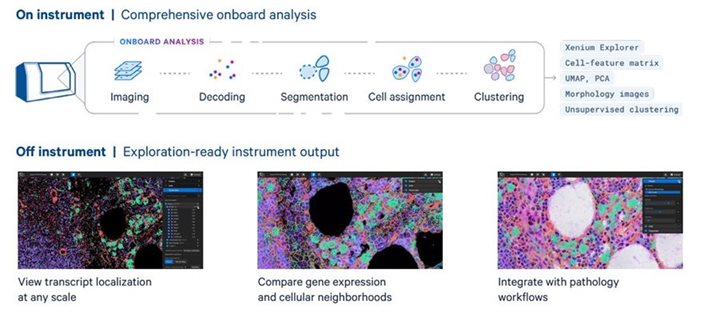
10X Genomics Xenium Analyzer
State-of-the-art single cell spatial imaging platform. Compatible with Fresh Frozen (FF) or FFPE tissues utilzing diverse menu of customizable panels. For more information on available panels, please click here.
Once tissues sections are placed on the Xenium Slide hand off to the GRC for us to complete processing:
Analysis once the imaging is complete:
If you are interested in completing a Xenium experiment, please contact us to discuss your project in more detail!
How to start a 10X Xenium project with the GRC:
1) We prefer to have meetings with investigators to discuss the steps of the project and ensure this is the correct approach for your research goals. It is critical to meet with the GRC staff to ensure the instrument and necessary reagents are available for your project. Please contact us to schedule a meeting.
2) Determine which panel will work for your project. Available standard panels can be found on the 10X Genomics page. If you would like additional custom genes added or would like to consider a custom panel alone, please contact us.
3) Section to determine DV200%. 10X Genomics recommends DV200% of 30% or greater for Xenium experiments.
- Smaller Tissues (≤6.5 x 6.5 mm) = 4 (10 um) Sections
- Larger Tissues (≥6.5 x 6.5 mm) = 1-2 (10 um) Sections
3) Tissue(s) must be sectioned within the Sample Area on the Xenium Slide (10.45 mm x 22.45 mm). Avoid covering fiducials and ensure there is no overlap of tissue sections. Please consult the following guides for more information: Tissue Preparation Guide for FFPE and Tissue Preparation Guide for Fresh Frozen. If you need assistance with cutting, please let us know. We often work with Jeff Fox at the CMSR. There are break points where the slide can be transferred FOR FFPE TISSUES:
- If you have no oven, you can transfer slides to GRC after sectioning (step 3.1f). This requires coordination to ensure the slides are processed appropriately.
- If you have no desiccator, you can transfer slides to GRC after drying in oven (step 3.1g). This requires coordinate to ensure the slides are placed in the GRC desiccator in a timely manner.
- If you are able to section, dry in the oven, and place in desiccator, the slides are stable for up to 4 weeks. Please contact a member of the GRC staff to coordinate slide transfer for further processing.
If you are sectioning FRESH FROZEN TISSUE:
- Equilibrate Xenium slide to cryostat chamber temperature. No sections should be placed on a RT slide.
- Place section in Sample Area and place finger on back of slide for a few seconds to warm to adhere to slide. If additional sections need to be placed, keep the Xenium slide in the cryostat on the cryobar at all times to avoid warming while continuing with sectioning.
- Once sectioning is complete, transfer slide to a pre-equilibrated slide holder and transfer to -80C for up to 4 weeks. Let the GRC know that you have completed sectioning and we will coordinate transfer of the slide (on dry ice).
4) GRC staff will process the remainder of the protocol for you. Once the slides are placed on the Xenium analyzer, we will let you know an approximate ETA for completion.
5) All files will be transferred to the investigator through SMDNAS02 or through a secure delivery link.

NanoString GeoMx Spatial Profiling
Compatible with many tissue types:

No special slides are required for this platform as long as tissue is placed within the green area shown above.
Profile Protein with oligo labeled antibodies or RNA with oligo-labeled probes:
- Whole Transcriptome RNA profiling with 18,000+ gene specific probes for human/mouse
- Protein: developed Human + Mouse Immunology and Oncology Panels with custom options available through abcam
How to start a nanostring geomx project with the GRC:
1) We prefer to have meetings with investigators to discuss the steps of the project and ensure this is the correct approach for your research goals. It is critical to meet with the GRC staff to ensure the instrument and necessary reagents are available for your project. Please contact us to schedule a meeting.
2) Next, identify morphology markers that will help with morphological identification of your tissue of interest and assist with Region of Interest (ROI) selection. NanoString GeoMx has a list of tested markers available here.
3) Test the morphology markers on your tissues using the NanoString protocol. This can be done by the lab or by the GRC. You should use tissue blocks that allow for testing or tissue blocks that are comparable to the tissue you would like to use for your experiment.
4) Scan the test slides to obtain morphology marker stain efficiency and to practice ROI selection to familiarize yourself with the software and better understand the capabilities of the system.
5) Once the testing phase is complete, proceed with tissue placement and move forward with gene expression or protein experiment. There will be a stage of ROI selection which is time sensitive. We will be sure to coordinate this with the availability of the lab members to ensure ample time to select ROIs.
For more information about the spatial technologies and how we can support your research goals, please contact us!